---
layout: learn
description: How to use Blockstack on iOS Mobile
permalink: /:collection/:path.html
---
# iOS SDK Tutorial (Pre-release)
{:.no_toc}
This tutorial teaches you how to create a decentralized application using
Blockstack's iOS SDK using the following content:
* TOC
{:toc}
This tutorial was extensively tested using Xcode Version 9.3 (9E145) on a MacBook Pro
running Mojave 10.14. If your environment is different, you may encounter
slight or even major discrepancies when performing the procedures in this
tutorial. Please [join the Blockstack community Slack](https://slofile.com/slack/blockstack) and post questions or comments to
the `#support` channel.
Finally, this tutorial is written for all levels from the beginner to the most
experienced. For best results, beginners should follow the guide as written. It
is expected that the fast or furiously brilliant will skip ahead and improvise
on this material at will. God speed one and all.
If you prefer, you can skip working through the tutorial all together. Instead,
you can [download the final project code](images/hello-blockstack.zip) and import it
into XCode to review it.
## Understand the sample application flow
When complete, the sample application is a simple `hello-world` intended for use
on an iOS phone.

Only users with an existing `blockstack.id` can run your
final sample application. When complete, users interact with the sample
application by doing the following:

## Set up your environment
This sample application requires two code bases, a BlockStack `hello-blockstack` web
application and a `hello-ios` iOS application. You use the iOS application to run the
web application on an iOS device.
Before you start developing the sample, there are a few elements you need in
your environment.
### Install XCode
If you are an experienced iOS developer and already have an iOS
development environment on your workstation, you can use that and skip this
step. However, you may need to adjust the remaining instructions for your
environment.
Follow the installation instructions to [download and XCode](https://developer.apple.com/xcode/) for your operating system.
Depending on your network connection, this can take between 15-30 minutes.
### Do you have npm?
The Blockstack code in this tutorial relies on the `npm` dependency manager.
Before you begin, verify you have installed `npm` using the `which` command to
verify.
```bash
$ which npm
/usr/local/bin/npm
```
If you don't find `npm` in your system, [install
it](https://www.npmjs.com/get-npm).
### Install the CocoaPods 1.6.0.beta.1 dependency manager
The sample application only runs on devices with iOS 11.0 or higher. You install
the Blockstack iOS SDK through the CocoaPods. Cocoapods is a dependency manager
for Swift and Objective-C Cocoa projects. It’s a simple, user friendly way to
use libraries from the community in your project.
You must use the `1.6.0.beta.1` version of CocoaPods or newer to avoid an
incapability between Cocoapods and XCode. Before starting the tutorial, confirm
you have installed CocoaPods.
```bash
$ pod --version
1.6.0.beta.2
```
If you don't have the CocoaPods beta version, install it:
```bash
sudo gem install cocoapods -v 1.6.0.beta.2
```
### Use npm to install Yeoman and the Blockstack App Generator
{% include scaffolding.md %}
## Build the Blockstack hello-world
In this section, you build a Blockstack `hello-world` application. Then, you
modify the `hello-world` to interact with the iOS app via a redirect.
### Generate and launch your hello-blockstack application
In this section, you build an initial React.js application called
`hello-blockstack`.
1. Create a `hello-blockstack` directory.
```bash
mkdir hello-blockstack
```
2. Change into your new directory.
```bash
cd hello-blockstack
```
3. Use Yeoman and the Blockstack application generator to create your initial `hello-blockstack` application.
```bash
yo blockstack:react
```
You should see several interactive prompts.
```bash
$ yo blockstack:react
==========================================================================
We are constantly looking for ways to make yo better!
May we anonymously report usage statistics to improve the tool over time?
More info: https://github.com/yeoman/insight & http://yeoman.io
========================================================================== No
_-----_ ╭──────────────────────────╮
| | │ Welcome to the │
|--(o)--| │ Blockstack app │
--------- │ generator! │
( _´U`_ ) ╰──────────────────────────╯
/___A___\ /
| ~ |
__'.___.'__
´ ` |° ´ Y `
? Are you ready to build a Blockstack app in React? (Y/n)
```
4. Respond to the prompts to populate the initial app.
After the process completes successfully, you see a prompt similar to the following:
```bash
[fsevents] Success:
"/Users/theuser/repos/hello-blockstack/node_modules/fsevents/lib/binding/Release/node-v59-darwin-x64/fse.node"
is installed via remote npm notice created a lockfile as package-lock.json.
You should commit this file. added 1060 packages in 26.901s
```
5. Run the initial application.
```bash
npm start
> hello-blockstack@0.0.0 start /Users/moxiegirl/repos/hello-blockstack
> webpack-dev-server
Project is running at http://localhost:8080/
webpack output is served from /
404s will fallback to /index.html
Hash: 4d2312ba236a4b95dc3a
Version: webpack 2.7.0
Time: 2969ms
Asset Size Chunks Chunk Names
....
Child html-webpack-plugin for "index.html":
chunk {0} index.html 541 kB [entry] [rendered]
[0] ./~/lodash/lodash.js 540 kB {0} [built]
[1] ./~/html-webpack-plugin/lib/loader.js!./src/index.html 533 bytes {0} [built]
[2] (webpack)/buildin/global.js 509 bytes {0} [built]
[3] (webpack)/buildin/module.js 517 bytes {0} [built]
webpack: Compiled successfully.
```
At this point, the browser is running a Blockstack server on your local host.
6. Navigate to `http://localhost:8080` with your browser to display the
application.

This local instances is for testing your applications only.
7. Choose **Sign in with Blockstack**
The system displays a prompt allowing you to create a new Blockstack ID or restore an existing one.

8. Follow the prompts appropriate to your situation.
If you are restoring an existing ID, you may see a prompt about your user
being nameless, ignore it. At this point you have only a single application
on your test server. So, you should see this single application, with your
own `blockstack.id` display name, once you are signed in:

### Add a redirect end point to your application
When a user opens the webapp from the Blockstack Browser on an iOS phone,
you want the web app to redirect the user to your iOS application. The work
you do here will allow it.
1. From the terminal command line, change directory to your web
application directory.
2. Create a `public` directory.
```bash
$ mkdir public
```
2. Use the `touch` command to add a redirect endpoint to your application.
This endpoint on the web version of your app will redirect iOS users back
to your mobile app.
```bash
$ touch public/redirect.html
```
3. Open `redirect.html` and add code to the endpoint.
```
Hello, Blockstack!
```
Blockstack apps are identified by their domain names. The endpoint will
receive a get request with the query parameter `authResponse=XXXX` and
should redirect the browser to `myblockstackapp:XXXX`.
`myblockstackapp:` is custom protocol handler. The handler should be unique
to your application. Your app's web-based authentication uses this handler
to redirect the user back to your iOS app. Later, you'll add a reference
to this handler in your iOS application.
5. Close and save the `redirect.html` file.
6. Ensure your Blockstack app compiles successfully.
The `npm` process should detect and compile your change.
## Build the hello-blockstack-ios
Now, you build an iOS application that can access and run your Blockstack web
application on a mobile device.
### Create an XCode Project
This tutorial uses XCode 9.3, you can use another version but be aware that some
menu items and therefore these procedures may be differœent on your version.
1. Launch the XCode interface.
2. Choose **Create new XCode project**.
3. Select **iOS**.
4. Select **Single View App**.

5. **Choose options for your new project** for your project.

6. Press **Next**.
The system prompts you for a location to store your code.
7. Save your project in your `hello-blockstack` directory.
When you are done, you will have a `hello-blockstack/hello-blockstack-ios` subdirectory.
8. Close XCode.
### Add and edit a Podfile
To use CocoaPods you need to define the XCode target to link them to.
So, for exampleM if you are writing an iOS app, it would be the name of your app.
Create a target section by writing target `$TARGET_NAME do` and an `end` a few
lines after.
1. Open a terminal window on your workstation.
2. Navigate to and change directory into the root of your project directory.
```swift
$ cd hello-blockstack-ios
```
3. Create a Podfile.
```bash
$ pod init
```
The command creates a `Podfile` in the directory.
4. Open the `Podfile` for editing.
5. Add a line stating the Blockstack dependency.
```
# Uncomment the next line to define a global platform for your project
# platform :ios, '9.0'
target 'hello-blockstack-ios' do
# Comment the next line if you're not using Swift and don't want to use dynamic frameworks
use_frameworks!
# Pods for hello-blockstack-ios
pod 'Blockstack'
target 'hello-blockstack-iosTests' do
inherit! :search_paths
# Pods for testing
end
end
```
8. Save and close the `Podfile`.
### Install Blockstack SDK and open the pod project
1. Close your new XCode project.
2. Change to the root of your `hello-blockstack-ios` project.
3. Initialize the project with Cocoapods.
```bash
$ pod install
Analyzing dependencies
Downloading dependencies
Installing Blockstack (0.2.0)
Installing CryptoSwift (0.11.0)
Generating Pods project
Integrating client project
[!] Please close any current XCode sessions and use `hello-blockstack-ios.xcworkspace` for this project from now on.
Sending stats
Pod installation complete! There is 1 dependency from the Podfile and 2 total pods installed.
[!] Automatically assigning platform `ios` with version `11.4` on target `hello-blockstack-ios` because no platform was specified. Please specify a platform for this target in your Podfile. See `https://guides.cocoapods.org/syntax/podfile.html#platform`.
```
This command creates a number of files
4. Review the files that the `pod` installation created:
```bash
$ ls
Podfile hello-blockstack-ios hello-blockstack-iosTests
Podfile.lock hello-blockstack-ios.xcodeproj
Pods hello-blockstack-ios.xcworkspace
```
5. Start XCode and choose **Open another project**.
6. Choose the `.xcworkspace` file created in your project folder.

When you open the workspace, the system will begin indexing the project. Then, after indexing, you may see a warning indicator at the top in the
project title. If you see the warning, continue to step 7. Otherwise, go to the next section.
7. Click the signal to reveal the warning.
8. Click **Update to recommended settings**.

9. Choose **Perform Changes** and **Continue** when prompted.
The indicator disappears.
### Choose a custom protocol handler
You'll need to choose a custom protocol handler that is unique to your app. This
is so that your app's web-based authentication `redirect.html` endpoint can redirect
the user back to your iOS app. In this example, you use `myblockstackapp://`.
1. Open the `.xcworkspace` file in XCode if it isn't open already.
2. Select the top node of your project.
1. Select the **Info** tab in XCode.
2. Scroll to **URL Types** and press **+** (plus) sign.
3. Enter an **Identifier** and **URL Schemes** value.
| **Identifier** | `MyBlockstackApp` |
| **URL Schemes** | `myblockstackapp` |
4. Set the **Role** to **Editor**.
When you are done the **URL Types** appears as follows:

### Add a splash screen
All iOS applications require a splash page.
1. Select `Assets.xcassets`
2. Move your cursor into the area below Appicon.
3. Right click and choose **New Image Set**

4. Download the Blockstack icon.

5. Drag the downloaded file into the **3X** position in your new Images folder.

6. Select the `LaunchScreen.storyboard`.
7. Choose **Open As > Source Code**.
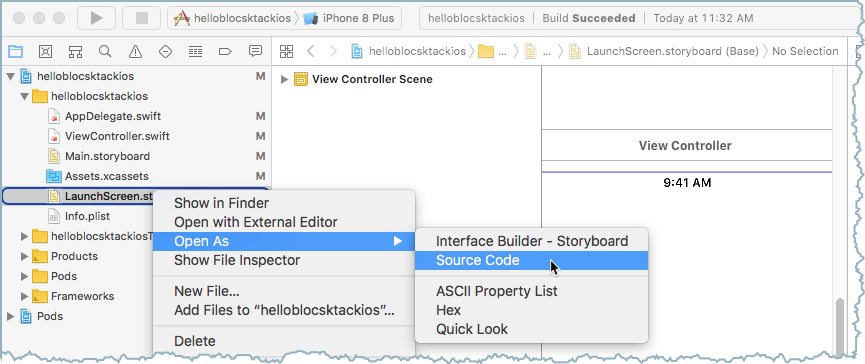
8. Replace the content of the `` element with the following:
```
```
9. Immediately after scenes but before the close of the `` tag add the following ``.
```xml
```
10. Choose **Run > Run app** in the emulator.
The emulator now contains a new splash screen.

### Update the Main.storyboard
Rather than have you build up your own UI, this section has you copy and paste a layout into the XML file source code for the **Main.storyboard** file.
1. Select the `Main.storyboard` file.
2. Choose **Open As > Source Code**
The `blockstack-example/blockstack-example/Base.lproj/Main.storyboard` file
defines the graphical elements. Some elements are required before you can
functionality to your code.
3. Within the `` element, replace the existing `` subelement with the following:
```xml
```
### Add the UI variables to the ViewController file.
In this section, you edit the `ViewController.swift` file using the storyboard as a starting point.
1. Select the **Main.storyboard** and choose **Open As > Interface Builder - storyboard**.

2. With the interface builder open, display the `ViewController.swift` file in the right panel.

4. In the storyboard, select the **Sign into Blockstack** button.
5. Control-drag from the button to the code display in the editor on the right, stopping the drag at the line below controller's opening statement.
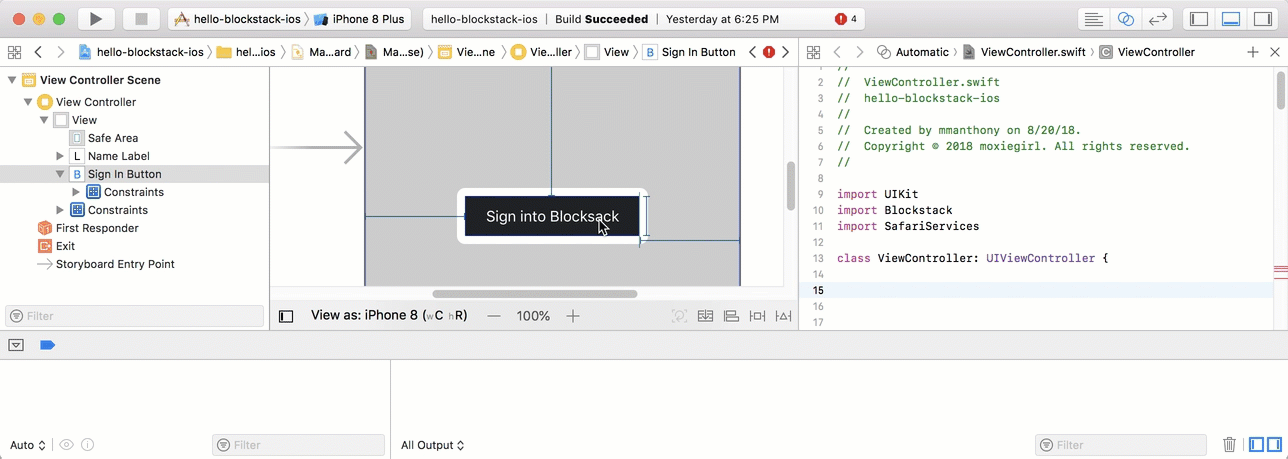
6. Repeat this process with the storyboard's purple **hello-blockstack-ios** label.
When you are done, your 'ViewController' file contains the following variables:
```swift
class ViewController: UIViewController {
@IBOutlet var nameLabel: UILabel!
@IBOutlet var signInButton: UIButton!
```
And XCode has added two outlines to the `Main.storyboard` source.
```xml
```
Your connectors will have their own `destination` and `id` values.
### Edit the ViewController.swift file
Now, you are ready to connect your application with your Blockstack Web
Application. Normally, after building your Web application you would have
registred it with Blockstack and the app would be available on the Web. This
example skips this registration step and uses an example application we've
already created for you:
`https://heuristic-brown-7a88f8.netlify.com/redirect.html`
This web application already has a redirect in place for you. You'll reference
this application in your mobile add for now. In XCode, do the following;
1. Open the `ViewController.swift` file.
2. Add an import both for `Blockstack`.
```
import UIKit
import Blockstack
```
3. Add a private `updateUI()` function.
This function takes care of loading the user data from Blockstack.
```swift
private func updateUI() {
DispatchQueue.main.async {
if Blockstack.shared.isUserSignedIn() {
// Read user profile data
let retrievedUserData = Blockstack.shared.loadUserData()
print(retrievedUserData?.profile?.name as Any)
let name = retrievedUserData?.profile?.name ?? "Nameless Person"
self.nameLabel?.text = "Hello, \(name)"
self.nameLabel?.isHidden = false
self.signInButton?.setTitle("Sign Out", for: .normal)
print("UI update SIGNED_IN")
} else {
self.nameLabel?.text = "hello-blockstack-ios"
self.signInButton?.setTitle("Sign into Blockstack", for: .normal)
print("UI update SIGNED_OUT")
}
}
}
```
The function uses the `Blockstack.shared.isUserSignedIn()` method to determine if
the user is already logged into Blockstack or not. It then uses the
`Blockstack.shared.loadUserData()` method to load the user data and update
the application display with the username.
5. Replace the content of the `viewDidLoad()` function so that it calls this private function.
```swift
override func viewDidLoad() {
super.viewDidLoad()
// Do any additional setup after loading the view, typically from a nib.
self.updateUI()
}
```
9. Create a 'signIn()' function that handles both sign in and out.
The function uses the `Blockstack.shared.signIn()` and
`Blockstack.shared.signUserOut()` methods to sign the user into the application.
```swift
@IBAction func signIn(_ sender: UIButton) {
if Blockstack.shared.isUserSignedIn() {
print("Currently signed in so signing out.")
Blockstack.shared.signUserOut()
self.updateUI()
} else {
print("Currently signed out so signing in.")
// Address of deployed example web app
Blockstack.shared.signIn(redirectURI: "https://heuristic-brown-7a88f8.netlify.com/redirect.html",
appDomain: URL(string: "https://heuristic-brown-7a88f8.netlify.com")!) { authResult in
switch authResult {
case .success(let userData):
print("Sign in SUCCESS", userData.profile?.name as Any)
self.updateUI()
case .cancelled:
print("Sign in CANCELLED")
case .failed(let error):
print("Sign in FAILED, error: ", error ?? "n/a")
}
}
}
}
```
## Troubleshooting your build in XCode
XCode builds can retain old data. To ensure your builds are clean, try the following:
1. Reset the simulator by choosing **Hardware -> Erase all content and settings** from the menu.
2. In XCode, clean the project by choosing **Product > Clean** from the menu or press 'Command + Shift + K' on your keyboard.
3. Clean the build folder by pressing 'Command + Option + Shift + K' on your keyboard.
4. Run the code on the simulator again.