--- layout: learn description: Learn about the Android SDK permalink: /:collection/:path.html --- # Android DApps {:.no_toc} This tutorial is written for readers who are new to either or both Blockstack and Android to create a decentralized application. It contains the following content: TOC {:toc} This tutorial was extensively tested using Android Studio 3.6 on a Dell XPS 13 running Ubuntu 19. If your environment is different, you may encounter slight or even major discrepancies when performing the procedures in this tutorial. Please [join the Blockstack discord server](https://chat.blockstack.org) and post questions or comments to the `#support` channel. Finally, this tutorial is written for all levels from the beginner to the most experienced. For best results, beginners should follow the guide as written. It is expected that the fast or furiously brilliant will skip ahead and improvise on this material at will. Fair journey one and all. If you prefer, you can skip working through the tutorial all together. Instead, you can [download the final project code](images/helloandroid.zip) and import it into Android Studio to review it. ## Understand the sample application flow When complete, the sample application is a simple `hello-world` display. It is intended for user on an Android phone. ![](images/final-app.png) Only users with an existing blockstack id can run your final sample application. When complete, users interact with the sample application by doing the following: ![](images/app-flow.png) ## Set up your environment This sample application has two code bases, a Blockstack `hello-blockstack` web application and a `hello-andriod` Android application. Before you start developing the sample, there are a few elements you need in your environment. ### Install Android Studio If you are an experienced Android developer and already have an Android development environment on your workstation, you can use that and skip this step. However, you will need to adjust the remaining instructions for your environment. Follow the installation instructions to download and [Android Studio 3.6](https://developer.android.com/studio/install) for your operating system. Depending on your network connection, this can take between 15-30 minutes. ![](images/studio-download.png) ### Do you have Node.js? Node.js v10 or higher is recommended the minimum supported version is Node.js v8. Before you begin, verify you have the correct version of Node.js and its tools installed. ```bash $ node -v v12.10.0 $ which npm npx /usr/local/bin/npm /usr/local/bin/npx ``` If you don't have these installed, take a moment to install or upgrade as needed. ## Build the Blockstack hello-world web app In this section, you build a Blockstack `hello-world` web application that acts as the companion site to your Android application. ### Generate and launch your hello-blockstack application {% include scaffolding.md %} In this section, you build an initial React.js application called `hello-blockstack`. 1. Create a `hello-blockstack` directory. ```bash mkdir hello-blockstack ``` 2. Change into your new directory. ```bash cd hello-blockstack ``` 3. Use the Blockstack application generator to create your initial `hello-blockstack` application. ```bash $ npx generator-blockstack --plain create package.json create .gitignore create webpack.config.js create netlify.toml create firebase.json ... npm WARN ajv-errors@1.0.1 requires a peer of ajv@>=5.0.0 but none is installed. You must install peer dependencies yourself. added 840 packages from 582 contributors and audited 843 packages in 18.84s found 0 vulnerabilities ``` Depending on your environment you may have some warnings with the installation. Optionally, you can fix these before continuing to the next section. 4. Depending on your environment, respond to the prompts to populate the initial app. You might see a prompt similar to the following: ```bash [fsevents] Success: "/Users/theuser/repos/hello-blockstack/node_modules/fsevents/lib/binding/Release/node-v59-darwin-x64/fse.node" is installed via remote npm notice created a lockfile as package-lock.json. You should commit this file. added 1060 packages in 26.901s ``` 5. After the initial setup you can now run the initial application. ```bash $ npm run start > hello-blockstack-webpack@0.0.0 start /home/user/hello-blockstack > webpack-dev-server ℹ 「wds」: Project is running at http://localhost:9000/ ℹ 「wds」: webpack output is served from / ℹ 「wds」: Content not from webpack is served from /home/user/hello-blockstack/dist ℹ 「wdm」: Hash: f5d88efe9c9194f66ddd Version: webpack 4.43.0 Time: 2733ms Built at: 05/19/2020 10:44:50 AM Asset Size Chunks Chunk Names main.js 5.39 MiB main [emitted] main .... [./src/index.js] 1.8 KiB {main} [built] + 610 hidden modules ℹ 「wdm」: Compiled successfully. ``` The system opens a browser displaying your running application. ![](images/blockstack-signin.png) At this point, the browser is running a Blockstack server on your local host. This is for testing your applications only. 6. Choose **Get started** The system displays a prompt allowing you to create a new Blockstack ID or restore an existing one. ![](images/create-restore.png) 7. Follow the prompts appropriate to your situation. At this point you have only a single application on your test server. So, you should see this single application, with your own `blockstack.id`, once you are signed in: ![](images/running-app.png) ## Create the hello-android project In this section, you'll create an Android application in Android Studio. You'll run the application in the emulator to test it. ### Create a simple project In this section, you create an inital project. You'll validate the application's iniatial state by creating an emulator to run it in. Open Android Studio and do the following: 1. Open Android Studio and choose **Start a new Andriod Studio project**. If studio is already started, choose **File > New > New Project**. 2. Choose a project template: select **Empty Activity** and press **Next** 3. Enter these fields in the **Create Android Project** page.
Name Hello Android
Package name blockstack.id.USERNAME.hello
Project location /home/USERNAME/AndroidStudioProjects/helloandroid
Language Select (Kotlin)
Minimum SDK Select (API 21: Android 5.0 (Lollipop))
![](images/configure-activity.png) 4. Press **Finish**. Android studio builds your initial project. This can take a bit the first time you do it. ### Run the app in an emulator In this section, you run the appliation and create an emulator when prompted. 1. Once the project is imported into studio, click the `app` module in the **Project** window. 2. Then, select **Run > Run** (or click the green arrow in the toolbar). Studio prompts you to **Select Deployment Target**. 3. Choose **Create New Virtual Device** and press **OK**. Studio prompts you to **Select Hardware**. 4. Choose a Phone device configuration like "Pixel". ![](images/select-hdw.png) Studio prompts you for a system image. 5. Choose **Q** which is API level 29 and press **Next**. ![](images/q-api.png) 
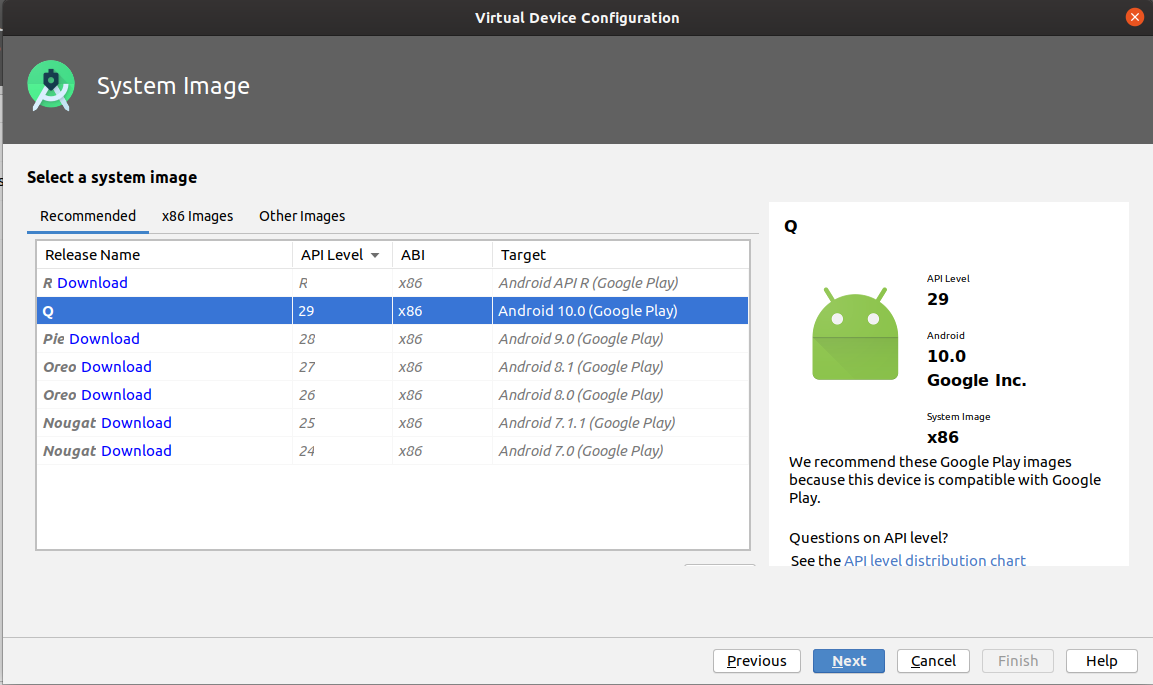
Studio asks you to verify your new emulator configuration. 
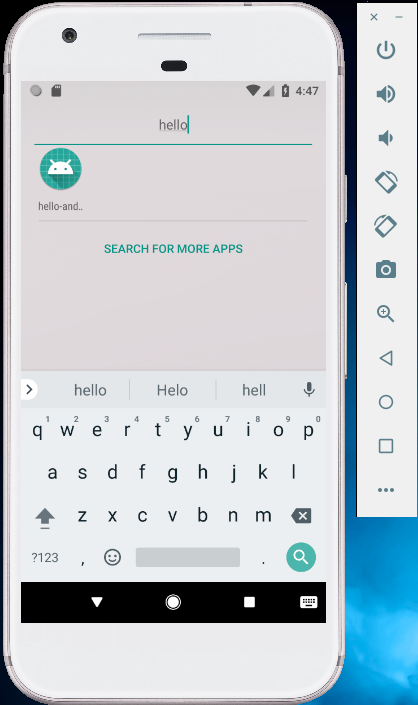
6. Press **Finish**. The emulation takes a moment to build. Then, studio launches the emulation and opens your application. ![](images/hello-andriod-1.png) ### Configure your application with the Blockstack SDK Now that you have created your initial project and verified it running in an emulator, you are ready to begin configuring the application for use with Blockstack. 1. In studio, open the `AndroidManifest.xml` file. 2. Add an `` with the custom handler for Blockstack. Replace the host ("flamboyant-darwin-d11c17.netlify.app") with your own url once you have hosted your web app publicly. ```XML ``` 3. Open the Project's `build.gradle` file ("Project: Hello Android"). 4. Add the Jitpack repository `maven { url 'https://jitpack.io' }` to the `repositories` section. for all projects When you finish, that section looks like this: ```JS allprojects { repositories { google() jcenter() maven { url 'https://jitpack.io' } } } ``` 5. Open the Module `build.gradle` file ("Module: app"). 6. Fix a problem with duplicate meta data in the Android SDK: add `packagingOptions` ```JS android { ... packagingOptions { exclude 'META-INF/*' } } ``` 7. Below this, add the Blockstack Android SDK dependency to your project's `dependencies` list: When you are done you should see: ```JS dependencies { implementation fileTree(dir: 'libs', include: ['*.jar']) implementation "org.jetbrains.kotlin:kotlin-stdlib-jdk7:$kotlin_version" implementation 'androidx.appcompat:appcompat:1.1.0' implementation 'androidx.core:core-ktx:1.2.0' implementation 'androidx.constraintlayout:constraintlayout:1.1.3' testImplementation 'junit:junit:4.12' androidTestImplementation 'androidx.test.ext:junit:1.1.1' androidTestImplementation 'androidx.test.espresso:espresso-core:3.2.0' implementation 'com.github.blockstack:blockstack-android:7940940' implementation 'androidx.lifecycle:lifecycle-runtime-ktx:2.2.0' } ``` **NOTE**: Ignore the warning on the `junit` dependencies. 8. Sync your project. ![](images/sync-project.png) Be sure to check the sync completed successfully. ![](images/sync-success.png) 9. Run your app in the emulator. You've made a lot of changes, make sure the emulator is still running correctly. ### Add a simple interface 1. Open the `app/res/layout/activity_main.xml` file. The `activity_main.xml` file defines the graphical elements. Some elements are required before you can functionality to your `MainActivity.kt` code. 2. Replace the entire content of the file with the following code: The new interface includes a `BlockstackSignInButton` which is provided by the SDK. This SDK includes a themed "Get Started" button (`BlockstackSignInButton`). You use this button here with the `org.blockstack.android.sdk.ui.BlockstackSignInButton` class. ```XML ``` This codes adds a button and some text to your application. 3. Choose **Run > Apply changes**. 4. Choose **Run > Run app** in the emulator. The emulator now contains a new interface with a button: ![](images/new-interface.png) ### Add session & authentication code 1. Open the `MainActivity.kt` file. 2. Add some additional imports to the top, replace the `android.os.Bundle` import. When you are done, your imports should appear as follows: ```kotlin import android.content.Intent import android.os.Bundle import androidx.appcompat.app.AppCompatActivity import androidx.lifecycle.lifecycleScope import kotlinx.android.synthetic.main.activity_main.* import kotlinx.coroutines.Dispatchers import kotlinx.coroutines.launch import org.blockstack.android.sdk.BlockstackSession import org.blockstack.android.sdk.BlockstackSignIn import org.blockstack.android.sdk.SessionStore import org.blockstack.android.sdk.getBlockstackSharedPreferences import org.blockstack.android.sdk.model.UserData import org.blockstack.android.sdk.model.toBlockstackConfig import org.blockstack.android.sdk.ui.SignInProvider import org.blockstack.android.sdk.ui.showBlockstackConnect ``` 3. Add one variable for the Blockstack sign-in flow and one for the Blockstack session that deals with all other function. This needs to be added before `onCreate`. ```kotlin class MainActivity : AppCompatActivity() { private lateinit var blockstackSession: BlockstackSession private lateinit var blockstackSignIn: BlockstackSignIn override fun onCreate(savedInstanceState: Bundle?) { super.onCreate(savedInstanceState) setContentView(R.layout.activity_main) } } ``` 4. Replace the existing the `onCreate` function with the following, use your own domain if you are already hosting your web app somewhere: ```kotlin override fun onCreate(savedInstanceState: Bundle?) { super.onCreate(savedInstanceState) setContentView(R.layout.activity_main) val appConfig = "https://flamboyant-darwin-d11c17.netlify.app".toBlockstackConfig() val sessionStore = SessionStore(getBlockstackSharedPreferences()) blockstackSession = BlockstackSession(sessionStore, appConfig) blockstackSignIn = BlockstackSignIn(sessionStore, appConfig) BlockstackSignIn.shouldLaunchInCustomTabs = false signInButton.setOnClickListener { showBlockstackConnect() } if (intent?.action == Intent.ACTION_VIEW) { // handle the redirect from sign in userDataTextView.text = "Signing in now ..." lifecycleScope.launch(Dispatchers.IO) { handleAuthResponse(intent) } } } ``` This new `onCreate` does several things: - Supply authentication information for connecting to your Blockstack app: `appDomain` (for `scopes`, `redirectURI`, `manifestURI` the default values are used) - Add a listener for the button click. - Handles the redirect intent from the sign-in flow. Notice that the application in this example is a URI you have not set up. Registering and application name takes time, so in time's interest you'll use an existing app (https://flamboyant-darwin-d11c17.netlify.app) that is identical to the `hello-world` you created earlier. For a production version, you'll need to replace `appDomain`, `redirectURI`, `manifestURI` and `scopes` with values appropriate for your app. 5. Add a private function to reflect when a user successfully signs in. ```kotlin private fun onSignIn(userData: UserData) { userDataTextView.text = "Signed in as ${userData.decentralizedID}" signInButton.isEnabled = false } ``` 6. Create a handler for the authentication response. ```kotlin private fun handleAuthResponse(intent: Intent) { val authResponse = intent.data?.getQueryParameter("authResponse") if (authResponse != null) { val userData = blockstackSession.handlePendingSignIn(authResponse) if (userData.hasValue) { // The user is now signed in! runOnUiThread { onSignIn(userData.value!!) } } } } ``` 7. Add `SignInProvider` interface for better user onboarding. Let the activity implement the interface and implement the member function `getBlockstackSignIn` ```kotlin class MainActivity : AppCompatActivity(), SignInProvider { ... override fun provideBlockstackSignIn(): BlockstackSignIn { return blockstackSignIn } } ``` 8. Verify your final `MainActivity.kt` code looks like this: ```kotlin package blockstack.id.user.hello import android.content.Intent import android.os.Bundle import androidx.appcompat.app.AppCompatActivity import androidx.lifecycle.lifecycleScope import kotlinx.android.synthetic.main.activity_main.\* import kotlinx.coroutines.Dispatchers import kotlinx.coroutines.launch import org.blockstack.android.sdk.BlockstackSession import org.blockstack.android.sdk.BlockstackSignIn import org.blockstack.android.sdk.SessionStore import org.blockstack.android.sdk.getBlockstackSharedPreferences import org.blockstack.android.sdk.model.UserData import org.blockstack.android.sdk.model.toBlockstackConfig import org.blockstack.android.sdk.ui.SignInProvider import org.blockstack.android.sdk.ui.showBlockstackConnect class MainActivity : AppCompatActivity(), SignInProvider { private lateinit var blockstackSession: BlockstackSession private lateinit var blockstackSignIn: BlockstackSignIn override fun onCreate(savedInstanceState: Bundle?) { super.onCreate(savedInstanceState) setContentView(R.layout.activity_main) val appConfig = "https://flamboyant-darwin-d11c17.netlify.app".toBlockstackConfig() val sessionStore = SessionStore(getBlockstackSharedPreferences()) blockstackSession = BlockstackSession(sessionStore, appConfig) blockstackSignIn = BlockstackSignIn(sessionStore, appConfig) BlockstackSignIn.shouldLaunchInCustomTabs = false signInButton.setOnClickListener { showBlockstackConnect() } if (intent?.action == Intent.ACTION_VIEW) { // handle the redirect from sign in userDataTextView.text = "Signing in now ..." lifecycleScope.launch(Dispatchers.IO) { handleAuthResponse(intent) } } } private fun onSignIn(userData: UserData) { userDataTextView.text = "Signed in as ${userData.decentralizedID}" signInButton.isEnabled = false } private suspend fun handleAuthResponse(intent: Intent) { val authResponse = intent.data?.getQueryParameter("authResponse") if (authResponse != null) { val userData = blockstackSession.handlePendingSignIn(authResponse) if (userData.hasValue) { // The user is now signed in! runOnUiThread { onSignIn(userData.value!!) } } } } override fun provideBlockstackSignIn(): BlockstackSignIn { return blockstackSignIn } } ``` ### Run the final app in the emulator 1. Choose **Run > Apply changes**. 2. Choose **Run > Run app** in the emulator. 3. When you see the application open, choose **Get Started**. 4. A small information is presented about the sign-in flow ![](images/connect-ui.png) 5. Select **Get Started** The system might prompt you how to select a browser. 6. Work through the Blockstack prompts to login. 7. Blockstack redirects you to a web site. Open it with your Android app: Select **Hello Android** and **Always** ![](images/connect-response.png) 8. The screen after the sign-in flow shows the owner address of the username that was entered during sign-in. ![](images/final-app.png) ## Where to go next Congratulations, you've completed your Android app using the Blockstack Android SDK. Learn more about Blockstack by [trying another tutorial](https://blockstack.org/tutorials).