10 KiB
| layout | permalink |
|---|---|
| learn | /:collection/:path.html |
Add Blockstack Auth to a website
{:.no_toc}
This tutorial walks you through adding Blockstack authentication to a web app. The site you build is a simple Rails site. You don't require any specialized Ruby or Rails knowledge to build this site. However, if you are a knowledgeable Rails programmer, you should be able to complete or extend this tutorial easily.
- TOC {:toc}
{% include note.html content="This tutorial was written on macOS High Sierra 10.13.4. If you use a Windows or Linux system, you can still follow along. However, you will need to "translate" the instructions appropriately for your operating system."%}
Set up your environment
This tutorial requires Ruby 2.0 or higher. To confirm you have Ruby installed and that the version, enter the following:
$ ruby -v
ruby 2.5.1p57 (2018-03-29 revision 63029) [x86_64-darwin16]
If you do not have Ruby installed, you should install it. If you want to run multiple, different versions
of Ruby on your workstation, you can use rvm.
After successfully installing Ruby, install the rails gem. This tutorial was
written using rails version 5.2.1. You can use the gem list command to see
if the gem is already installed. To install the rails gem, do the following:
$ gem install rails
Create a Rails website
-
Create a new Rails project by using the
rails newcommand:$ rails new blockstack-rails-exampleThe command generates a project directory.
-
Change directory to the
blockstack-rails-exampleproject directory.$ cd blockstack-rails-example -
Start your project with the
railsserver.$ rails sThe
sflag is the alias for server. -
Load the
http://localhost:3000address in your browser.You chould see default homepage that says
Yay! You're on Rails!.
-
Go ahead and stop the server by entering
CTRL-Con the command line.
Add a homepage
In this section, you add a homepage to your new website. To do this, you create
a new controller, called PagesController, that includes the homepage. To set
this up and test this, do the following:
-
Use
railsto generate the home page.$ rails generate controller pages homeThis command instructs rails to create a
controllernamespages, that includes the methodhome. After running this, you'll have a few new files:/app/controllers/pages/pages_controller.rb- this is the new controller you created, with ahomemethod/app/views/pages/home.html.erb- this is the template that rails will use to render the view forhome.
The command also modifies the pre-existing file
/config/routes.rband configures your server to use thehomemethod for the route/pages/home. -
Edit the
/config/routes.rbfile to match the following:Rails.application.routes.draw do root to: 'pages#home' # For details on the DSL available within this file, see http://guides.rubyonrails.org/routing.html endThis code calls the
rootmethod with thetooption which instructs rails to use thehomemethod in thepagescontroller as the homepage. -
Save and close the
/config/routes.rbfile. -
Start the rails server (
rails s) and open the new homepage, you should see your new homepage.
You can find the source for the home page in the
/app/views/pages/home.html.erbfile.
Install OmniAuth and OmniAuth-blockstack gems
You'll use the <a href=https://github.com/OmniAuth/OmniAuth=“_blank">OmniAuth plugin to setup Blockstack authentication. OmniAuth is a popular framework for integrating third-party authentication with a ruby on rails website. Blockstack provides an OmniAuth plugin, OmniAuth-blockstack to make this easy for you.
-
Stop the Rails server if it is running.
-
Edit the
Gemfilein the root of your project and add two gems, one for OmniAuth and one for the Blockstack plugin.gem 'omniauth' gem 'omniauth-blockstack' -
Save and close the
Gemfile. -
Install the gems by running the
bundle installcommand.$ bundle install{% include note.html content="
If the
bundlecommand returns a message:Your Ruby version is 2.0.0, but your Gemfile specified 2.5.1Check if the auto-generated
."%}Gemfileincludes a line that specifies a conflicting Ruby version. Make sure your `ruby` version matches theGemfileby runningruby -vYou can either switch to that version, or remove the lineruby '2.5.1'from yourGemfile
Add a OmniAuth callback for Blockstack
-
Create a new file at
config/initializers/omniauth.rb.$ touch config/initializers/omniauth.rbYou'll use this file to configure the OmniAuth gem and the Blockstack plugin.
-
Edit your new
config/initializers/omniauth.rbfile and add the following code:Rails.application.config.middleware.use OmniAuth::Builder do provider :blockstack endThis adds the OmniAuth middleware to your project, and tells OmniAuth to use the Blockstack provider. After a user signs in with OmniAuth, you need to specify a
callbackmethod for Blockstack to handle the rest of the sign in flow.The callback method is typically where you grab the authentication information from the third party, save some data, and sign the user in to your application by saving information in cookies.
-
Save and close the
config/initializers/omniauth.rbfile. -
Edit the
/app/controllers/pages_controller.rbfileThis file defines a
PagesControllerclass where you will add theblockstack_callbackmethod. When you are done the file should look like the following:class PagesController < ApplicationController def home end def blockstack_callback puts 'in the callback' blockstack_info = request.env['omniauth.auth'] session[:blockstack_user] = blockstack_info redirect_to '/' end endThe
putsline is just a debug output to the console. The gets the user's Blockstack info fromenv['omniauth.hash], which is where OmniAuth stores all authentication info. Then, that info is loaded into thesessionobject under the key:blockstack_user. By adding this info to the session, the info is saved to a cookie which is easy to reference later on. -
Edit the
/app/views/pages/home.html.erbfile and direct the user to sign in with Blockstack.Modify the HTML to look like this:
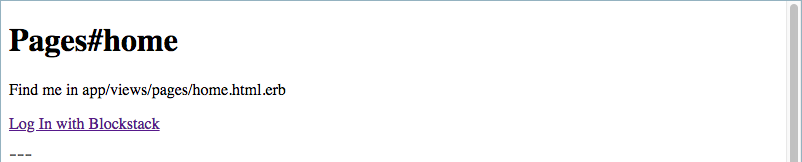
<h1>Pages#home</h1>
<p>Find me in app/views/pages/home.html.erb</p>
<p><a href="/auth/blockstack">Log In with Blockstack</a></p>
<code><%= debug session[:blockstack_user] %></code>
The home page directs the user to sign in with Blockstack. The
<%= debug session[:blockstack_user] %>tag tells rails to output the variablesession[:blockstack_user]in an easy-to-read format.This page creates a link to the route
/auth/blockstack. By default, OmniAuth adds routes to your application in the form of/auth/:provider. When the user visits that page, they're redirected through the third party authentication flow. -
Save and close the
/app/views/pages/home.html.erbfile. -
Edit the
config/routes.rbfile and configure a route to handle the Blockstack callback.Rails.application.routes.draw do root to: 'pages#home' get '/auth/blockstack/callback' => 'pages#blockstack_callback' # For details on the DSL available within this file, see http://guides.rubyonrails.org/routing.html endThe
getline tells the your server to invoke theblockstack_callbackmethod when the user visits/auth/blockstack/callback. By default, OmniAuth redirects the user to/auth/:provider/callbackwhenever the users comes back from a third-party login. -
Save and close the
config/routes.rbfile.
Test the Blockstack authentication
-
Start the rails server.
$ rails sYou should see the following:
-
Click the Log In with Blockstack link.

This connect takes you to the Blockstack

-
Log in with the Blockstack web application.
For information on creating or logging in with a Blockstack identity, see the use a Blockstack identity. After you finish signing in with your identity, you are redirected back to your homepage:

At this point, the Blockstack information is stored in the
session.
If you want to develop your application further, you would use a standard log
out to complete the session. Your code to log out would call
session[:blockstack_user] = nil to destroy the Blockstack information.
Conclusion
{:.no_toc}
Congratulations! You've successfully integrated Blockstack authentication into a website. You can now build out a fully-fledged rails app with the ability to use Blockstack for decentralized user authentication.
| Let folks know your work by tweeting: | Tweet your work! |