18 KiB
| layout | description | permalink | image |
|---|---|---|---|
| learn | Blockstack Zero-to-DApp tutorial | /:collection/:path.html | /assets/img/zero-to-dapp.png |
3 - Customize your kingdom (Windows)
{:.no_toc}
Zero to DAPP 3 of 4 for Windows (or MacOS/Linux)
In this page, you examine and modify the Animal Kingdom DApp you built in part 2. You'll review the underlying code and locate the portions of it which fulfill the requirements necessary to qualify an application for App Mining. You'll expand your knowledge of the application by extending it. Finally, you'll learn how to deploy a DApp.
This page contains the following topics
- TOC {:toc}
Before you get started
{:.no_toc}
Before you continue, make sure you can locate the key files and directories (folders) in your project. You'll need to make sure you have opened a terminal and have changed directory to the top of your Animal Kingdom project.

If you find it easier to navigate, you can use the Finder as well. Just remember you'll need the command line to run your project.
Understand the Animal Kingdom application code
The Animal Kingdom application has two major components, React and Blockstack. React is used to build all the web components and interactions. You could replace React with any framework that you like; Blockstack is web framework agnostic. This section does not explain the React in any detail; The discussion focuses on the Blockstack Javascript library the DApp instead.
The Blockstack Javascript library is all a developer needs to create a DApp. It grants the application the ability to authenticate a Blockstack identity and to read and write to the user's data stored in a Gaia hub.
Authenticating user identity
The src/App.js file creates a Blockstack UserSession and uses that session's
isUserSignedIn() method to determine if the user is signed in or out of the
application. Depending on the result of this method. The application redirects
to the src/SignedIn page or to the src/Landing.js page.
 import React, { Component } from 'react'
 import './App.css'
 import { UserSession } from 'blockstack'

 import Landing from './Landing'
 import SignedIn from './SignedIn'

 class App extends Component {

   constructor() {
     super()
     this.userSession = new UserSession()
   }

   componentWillMount() {
     const session = this.userSession
     if(!session.isUserSignedIn() && session.isSignInPending()) {
       session.handlePendingSignIn()
       .then((userData) => {
         if(!userData.username) {
           throw new Error('This app requires a username.')
         }
         window.location = `/kingdom/${userData.username}`
       })
     }
   }

   render() {
     return (
       <main role="main">
           {this.userSession.isUserSignedIn() ?
             <SignedIn />
           :
             <Landing />
           }
       </main>
     );
   }
 }

 export default App
The first time you start the application, this code determines if the user has
signed into the DApp previously. If not, it opens the Landing.js page. This
page offers the user an opportunity to Sign in to Blockstack.
Clicking the button ends up calling the redirectToSignIn() method which generates an
authentication request and redirects the user to the Blockstack Browser to
approve the sign in request. The actual Blockstack sign-in dialog depends on
whether the user already has an existing session in the Blockstack Browser.

Signing in with an identity is the means by which the user grants the DApp access. Access means the DApp can read the user profile and read/write user data for the DApp. Data is encrypted at a unique URL on a Gaia storage hub.
The source code imports UserSession from the Blockstack library. Data related to a given user-session is encapsulated in the session. In a web
browser, UserSession default behavior is to store session data in the
browser's local storage. This means that app developers can leave management of
session state to users. In a non-web browser environment, it is necessary to
pass in an instance of AppConfig which defines the parameters of the current
app.
App Mining Requirement: Blockstack Authentication
To participate in application mining your application must integrate Blockstack authentication.
Get and put user data to a Gaia Hub
Gaia is the Blockstack data storage hub (https://hub.blockstack.org). Once a user
authenticates, the application can get and put application data in the user's
storage. After a user signs in, the SignedIn.js code checks the user's Gaia
profile by running the loadMe() method.
loadMe() {
    const options = { decrypt: false }
    this.userSession.getFile(ME_FILENAME, options)
    .then((content) => {
      if(content) {
        const me = JSON.parse(content)
        this.setState({me, redirectToMe: false})
      } else {
        const me = null

        this.setState({me, redirectToMe: true})
      }
    })
  }
Most of the imports in this file are locally coded React components. For example, Kingdom.js, EditMe.js, and Card.js. The key Blockstack imports is the UserSession and an appConfig which is defined in the constants.js file.
The loadMe() code uses the Blockstack's UserSession.getFile() method to get
the specified file from the applications data store. If the users' data store on
Gaia does not have the data, which is the case for new users, the Gaia hub
responds with HTTP 404 code and the getFile() promise resolves to null. If you
are using a Chrome Developer Tools with the DApp, you'll see these errors in a
browser's developer Console.

After a user chooses an animal persona and a territory, the user presses Done and the application stores the user data on Gaia.
saveMe(me) {
  this.setState({me, savingMe: true})
  const options = { encrypt: false }
  this.userSession.putFile(ME_FILENAME, JSON.stringify(me), options)
  .finally(() => {
    this.setState({savingMe: false})
  })
}
The Blockstack putFile() stores the data provided in the
user's DApp data store. By default, putFile() stores data in an encrypted format which means only the user that stored it can view it. You can view the URL for the data store from a user's profile. Because this application wants other users to view the persona and territory, the data is not encrypted, so the encrypt option is set to false.
If you tested your Animal Kingdom, you can see this on your profile. To see your profile, go to the Blockstack explorer and search for your ID:

App Mining Optional: Gaia Storage
Use of Gaia storage is not required for application mining. Keep in mind, using Gaia may make data storage easier as it is designed to work in the Blockstack Ecosystem.
Application configuration
Your DApp contains three pages Animals, Territories, and Other Kingdoms that are derived from three code elements:
- The
src/constants.jsfile defines the application's data profile (AppConfig). - The
public\animalsdirectory which contains images. - The
public\territoriesdirectory which contains images.
In the next section, you extend your Kingdom's configuration by modifying these files.
Add a territory
If your application is still running in localhost stop it with a CTRL-C from
your keyboard.
-
Decide what kind of territory to add — desert, ocean, or city!
This example adds Westeros, a fictional territory.
-
Search for an image to represent your new territory.
Google images is a good place to find a JPEG image of Westeros.
-
Save the image to the
public/territoriesfolder in your Animal Kingdom project code.{% include warning.html content="The territory filename must be all lower case and have a
.jpgextension. For this example, the territory image is saved in thewesteros.jpgfile." %} -
Use the
lscommand to confirm your file appears interritoriesdirectory and has the correct name.PS C:\animal-kingdom-master> ls .\public\territories\ Directory: C:\animal-kingdom-master\public\territories Mode LastWriteTime Length Name -a 2/26/2019 6:09 AM 132814 forest.jpg -a 2/26/2019 6:09 AM 128272 tundra.jpg -a 2/26/2019 6:31 AM 1087534 westeros.jpg PS C:\animal-kingdom-master> -
Open the
src\constant.jsfile in your favorite editor. -
Scroll down to the section that defines the Territories.
export const TERRITORIES = [ { id: 'forest', name: 'Forest', superpower: 'Trees!' }, { id: 'tundra', name: 'Tundra', superpower: 'Let it snow!' } ] -
Add your new territory.
export const TERRITORIES = [ { id: 'forest', name: 'Forest', superpower: 'Trees!' }, { id: 'tundra', name: 'Tundra', superpower: 'Let it snow!' }, { id: 'westeros', name: 'Westeros', superpower: 'The Iron Throne!' } ] -
Save and close the
constant.jsfile. -
Back in a terminal window, restart your application.
c:\animal-kingdom-master> npm run start -
After the application starts, navigate to the Territories page and look for your
Westerosterritory.

Add the Blockstack kingdom to Other Kingdoms
Your Animal Kingdom only recognizes two Other Kingdoms. In this section,
you add a third, the Blockstack kingdom (https://animalkingdoms.netlify.com).
-
Open the
src/constant.jsfile in your favorite editor.On Windows you can use Notepad.
-
Scroll down to the section that defines the Other Kingdoms
export const OTHER_KINGDOMS = [
  {
    app: 'https://animal-kingdom-1.firebaseapp.com',
    ruler: 'larry.id'
  },
  {
    app: 'http://localhost:3001',
    ruler: 'larz.id'
  }
]
To add a kingdom, you need its URL and the ID of its owner.
-
Edit the file and add the
https://animalkingdoms.netlify.comwhich is owned bymoxiegirl.id.blockstack.When you are done the file will look like this.
export const OTHER_KINGDOMS = [ { app: 'https://animal-kingdom-1.firebaseapp.com', ruler: 'larry.id' }, { app: 'http://localhost:3001', ruler: 'larz.id' }, { app: 'https://animalkingdoms.netlify.com', ruler: 'moxiegirl.id.blockstack' } ] -
Save and close the
constants.jsfile. -
Back in your browser, navigate to the Other Kingdoms page.

-
Go to the
moxiegirlkingdom by clicking on her kingdom. -
Try adding a subject from Moxiegirl's kingdom to yours.
Deploy your DApp on the web
So far, you've been running the application locally. This means you are the only person that can use it to create a kingdom. You can make your application available to others by hosting it out on the internet. You can do this for free with a Netlify account.
App Mining Requirement: Review Accessibility
To participate in application mining your application must be available for review. Open source projects must provide the URL to their code. Projects with private repositories can provide their application in a package form.
Before you begin, you need to build a site that is ready to deploy.
-
In your terminal, press
CTRL-Con your keyboard to stop yournpm run startbuild. -
Build a website from your code by entering the
npm run buildcommand:npm run build
When the command completes, you should have a new
buildsubdirectory in your project. -
Open your project in the Finder.
-
Locate the newly created
buildsubfolder.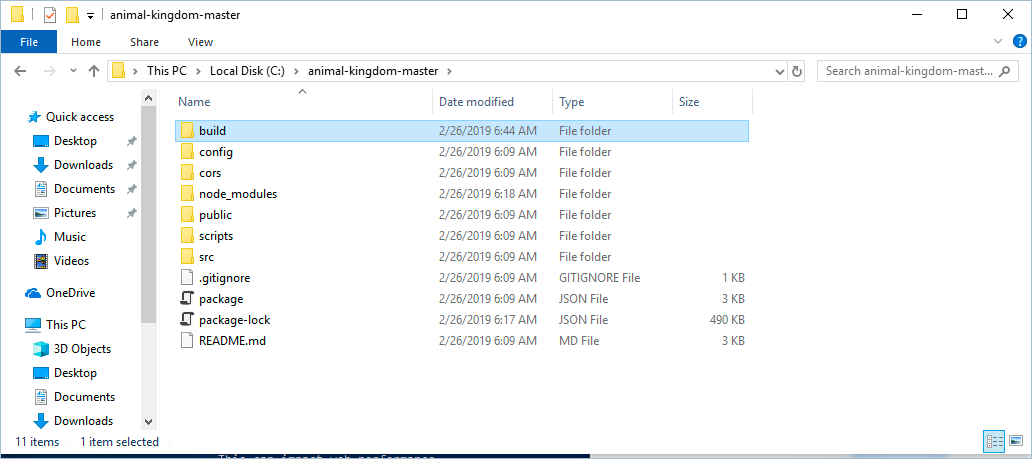
-
Sign up for a free Netlify account
This example assumes you create an account by providing an email and password.

-
In your email inbox, find Netlify's welcome email and verify your account.

-
Log into Netlify and go to the Overview page in your browser.
-
Drag your
buildsubdirectory from the Finder into the drop zone in Netlify.
After a moment, Netlify builds your code and displays the location of your new website.

-
Click on your website name to display the website.
You are prompted to sign into this new site with your Blockstack ID.
-
Click Sign in with Blockstack.
After you sign in, your website presents you with this message:
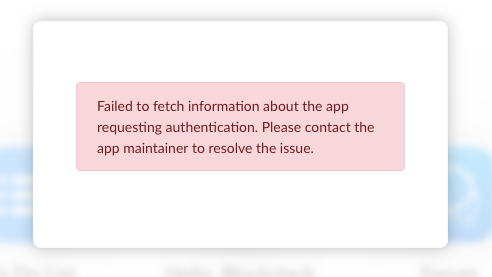
You get this message because, when you authenticate, your DApp at one URL requested a resource (an identity) from another DApp, the Blockstack Browser. A request for a resource outside of the origin (your new website) is called as a cross-origin request(CORs). Getting data in this manner can be risky, so you must configure your website security to allow interactions across origins.
Click me to learn how CORS is like borrowing a ladder.You can think of CORS interactions as an apartment building with Security. For example, if you need to borrow a ladder, you could ask a neighbor in your building who has one. Security would likely not have a problem with this request (i.e., same-origin, your building). If you needed a particular tool, however, and you ordered it delivered from an online hardware store (i.e., cross-origin, another site), Security may request identification before allowing the delivery man into the apartment building.
Credit: CodecademyThe way you configure CORs depends on which company is serving your website. You are using Netlify for this example.
-
Locate the
cors/_headersandcors/_redirectsfiles in your project.You can use the Finder or the
lscommand.
-
Copy them into your
builddirectory.To copy them with the
lscommand, enter the following in the root of theanimal-kingdom-masterproject.cp cors/_headers build cp cors/_redirects buildThe name of each file, with the underscore, is essential.
-
Drag the
buildfile back into the Netlify drop zone.After a moment, Netlify publishes your site. Check the published location, it may have changed.
-
Click on the link and log into your Animal Kingdom.
-
Recreate your animal person and territory.
The Animal Kingdom is identified by its location on the Internet, remember? So, the animal kingdom you created on your local workstation is different than the one you create on Netlify.
Add your Kingdom to our Clan
At this point, your kingdom is isolated. If you know another kingdom, you can add subjects from that kingdom but other kingdoms can't access your subjects. In this section, you use a free GitHub account to add your kingdom to the Blockstack kingdom.
-
If you have a GitHub account, go to step 2 otherwise go to GitHub site and create a new account.
-
Go to the https://github.com/blockstack/animal-kingdom/issues repository on Github.
-
Click New Issue.
The new issue dialog appears.
-
Fill out the issue with the URL from Netlify and your Blockstack id.
When you are done, your issue will look like the following:

-
Press Submit new issue.
The Blockstack team will add your Netlify kingdom to ours. When we do that, we will notify you on the issue and you'll also get an email.
-
When you receive the email, login to the Blockstack Animal kingdom to see your kingdom under Other Kingdoms.
Next steps (and a cool tshirt!)
{:.no_toc}
In the next part, you learn about how application mining can fund your DApp development efforts. And you will take a couple of minutes to add your Animal Kingdom DApp to App.co — the Universal App store. Completing this step earns you a limited edition t-shirt.
If you have a twitter account, why not tell some folks about your progress?